Databricks Lakehouse
Overview
This destination syncs data to Delta Lake on Databricks Lakehouse. Each stream is written to its own delta-table.
This connector requires a JDBC driver to connect to the Databricks cluster. By using the driver and the connector, you must agree to the JDBC ODBC driver license. This means that you can only use this connector to connect third party applications to Apache Spark SQL within a Databricks offering using the ODBC and/or JDBC protocols.
Currently, this connector requires 30+MB of memory for each stream. When syncing multiple streams, it may run into an out-of-memory error if the allocated memory is too small. This performance bottleneck is tracked. Once this issue is resolved, the connector should be able to sync an almost infinite number of streams with less than 500MB of memory.
Getting started
Databricks AWS Setup
1. Create a Databricks Workspace
- Follow Databricks guide
Create a workspace using the account console.
IMPORTANT: Don't forget to create a cross-account IAM role for workspaces
TIP: Alternatively use Databricks quickstart for new workspace
2. Create a metastore and attach it to workspace
IMPORTANT: The metastore should be in the same region as the workspaces you want to use to access the data. Make sure that this matches the region of the cloud storage bucket you created earlier.
Setup storage bucket and IAM role in AWS
Follow Configure a storage bucket and IAM role in AWS to setup AWS bucket with necessary permissions.
Create metastore
-
Login into Databricks account console with admin permissions.
-
Go to Data tab and hit Create metastore button:

-
Provide all necessary data and click Create:
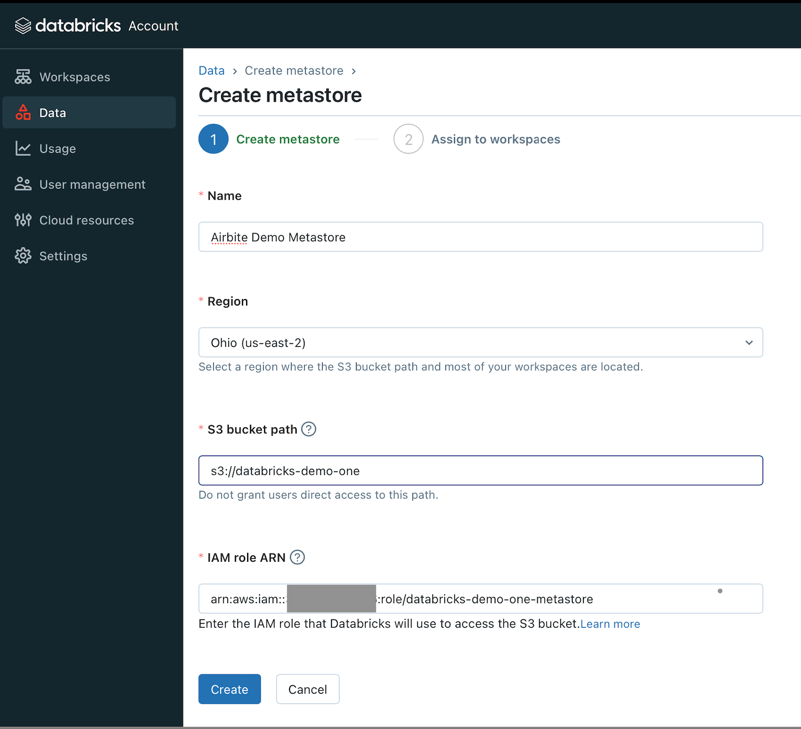
NameRegionThe metastore should be in same region as the workspace.S3 bucket pathcreated at Setup storage bucket and IAM role in AWS step.IAM role ARNcreated at Setup storage bucket and IAM role in AWS step. Example:arn:aws:iam::<AWS_ACCOUNT_ID>:role/<AWS_IAM_ROLE_NAME>
-
Select the workspaces in
Assign to workspacestab and click Assign.
3. Create Databricks SQL Warehouse
TIP: If you use Databricks cluster skip this step
-
Open the workspace tab and click on created workspace console:

-
Create SQL warehouse:
-
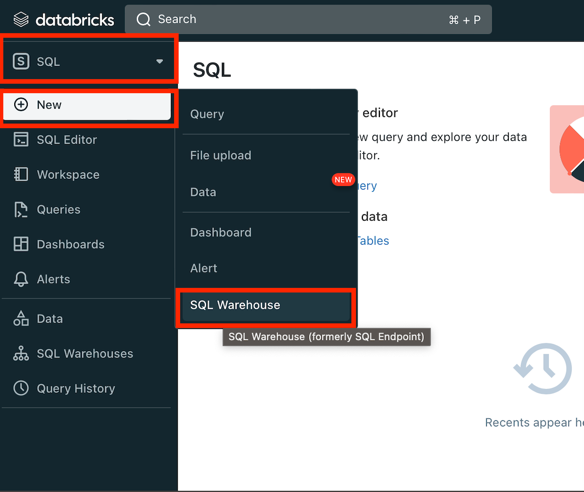
- Switch to SQL tab
- Click New button
- Choose SQL Warehouse
-
After SQL warehouse was created we can it's Connection details to con
4. Databricks SQL Warehouse connection details
TIP: If you use Databricks cluster skip this step
-
Open workspace console.
-
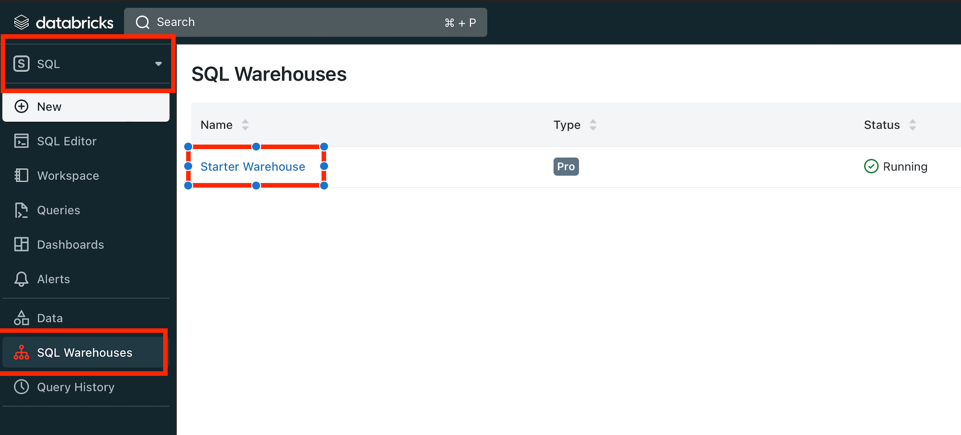
Go to SQL Warehouse section and open it
-
Open Connection Details tab:
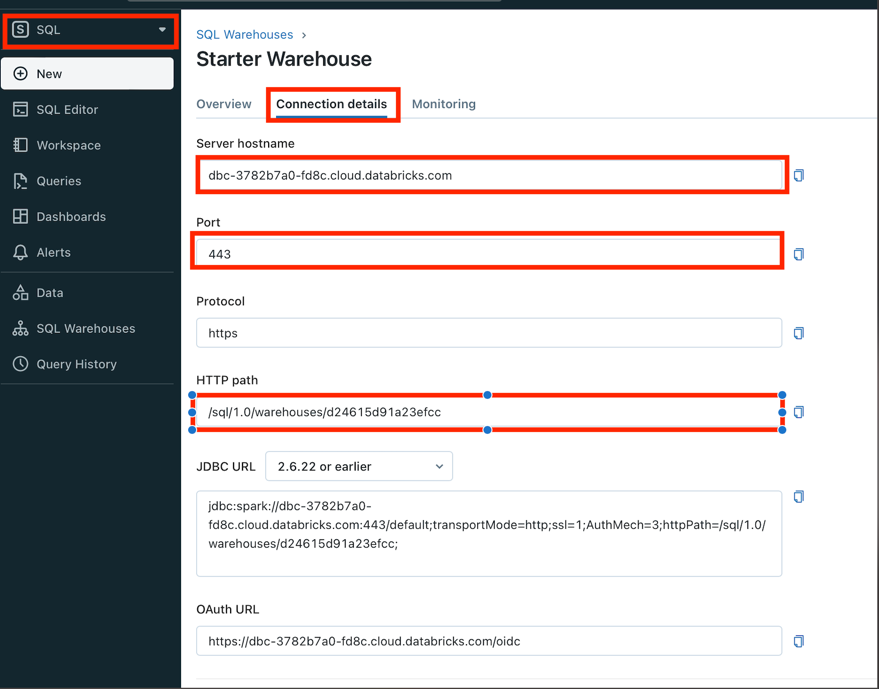
IMPORTANT:
Server hostname,Port,HTTP pathare used for HeroPixelconnection
5. Create Databricks Cluster
TIP: If you use Databricks SQL Warehouse skip this step
-
Open the workspace tab and click on created workspace console:

-
Create Cluster:
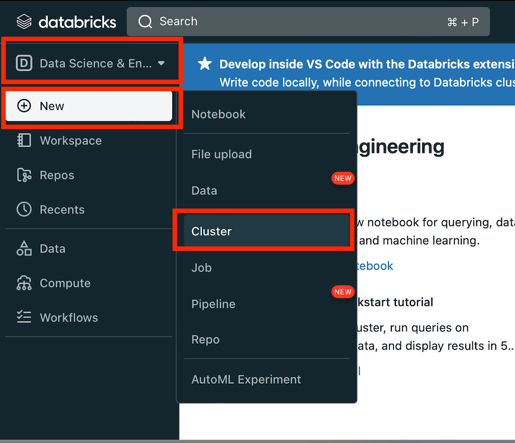
- Switch to Data science & Engineering
- Click New button
- Choose Cluster
6. Databricks Cluster connection details
TIP: If you use Databricks SQL Warehouse skip this step
-
Open workspace console.
-
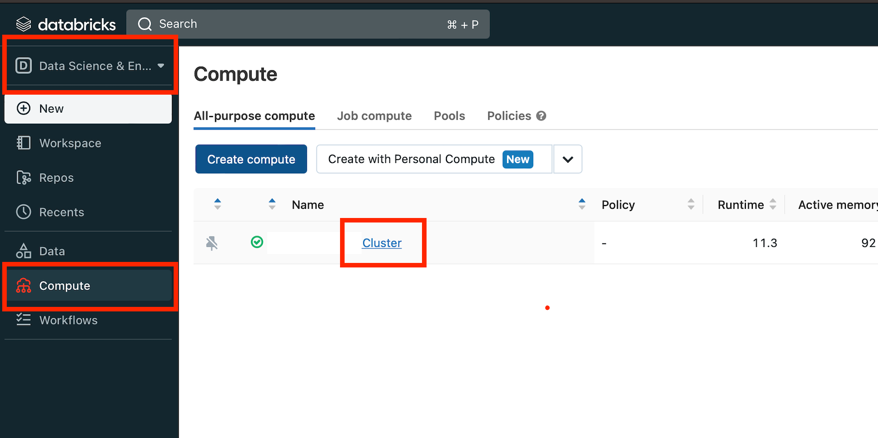
Go to Compute section under Data science & Engineering and click on cluster link:
-
Open Advanced options under Configuration, choose JDBC/ODBC tab:
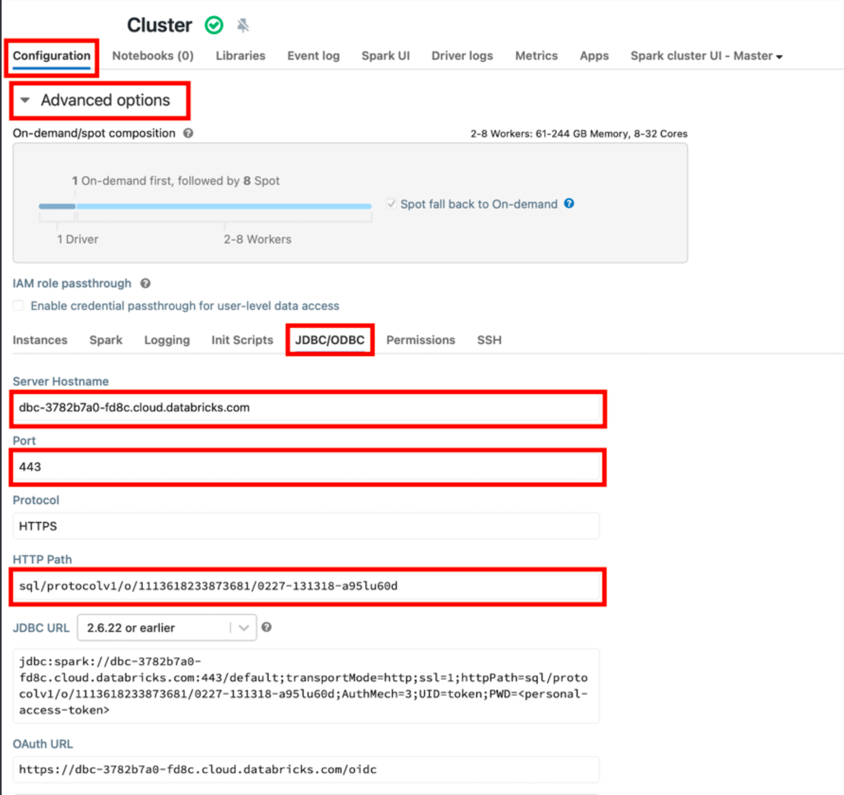
IMPORTANT:
Server hostname,Port,HTTP pathare used for HeroPixelconnection
7. Create Databricks Token
-
Open workspace console.
-
Open User Settings, go to Access tokens tab and click Generate new token:

-
In the new window put a comment (Optional) and lifetime:
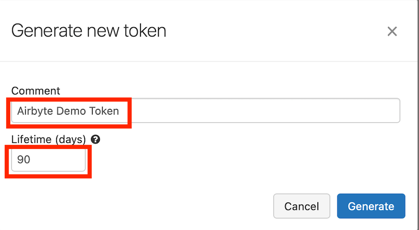
TIP:
Lifetimecan be set to0
8. Adding External Locations (Optional)
TIP: Skip this step if no external data source is used.
-
Open workspace console.
-
Go to
Datasection, expand onExternal Locationand clickCreate Locationbutton:
-
Fill in the fields and click Create button:
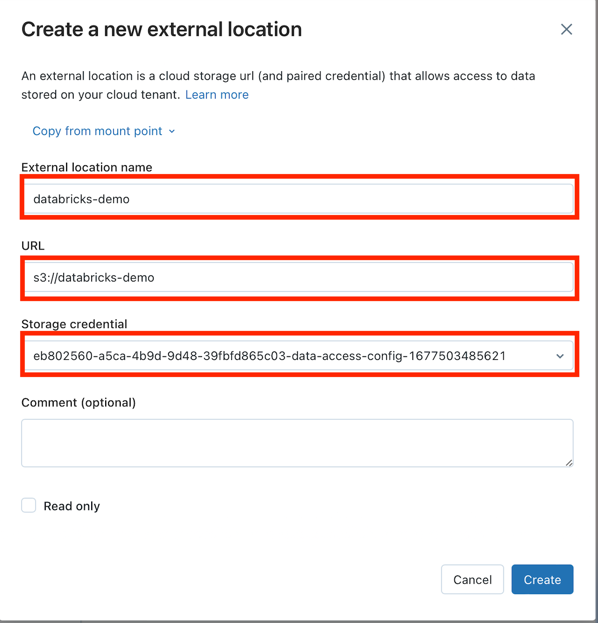
TIP: The new
Storage credentialcan be added in theStorage Credentialstab or use same as for Metastore.
HeroPixelSetup
Databricks fields
Agree to the Databricks JDBC Driver Terms & Conditions- Databricks JDBC ODBC driver license.Server Hostname- can be taken from 4. Databricks SQL Warehouse connection details or 6. Databricks Cluster connection details steps.HTTP Path- can be taken from 4. Databricks SQL Warehouse connection details or 6. Databricks Cluster connection details steps.Port- can be taken from 4. Databricks SQL Warehouse connection details or 6. Databricks Cluster connection details steps.Access Token- can be taken from 7. Create Databricks Token step.
Data Source
You could choose a data source type
- Managed tables
- Amazon S3 (External storage)
- Azure Blob Storage (External storage)
Managed tables data source type
Please check Databricks documentation about What is managed tables
TIP: There is no addition setup should be done for this type.
Amazon S3 data source type (External storage)
IMPORTANT: Make sure the
External Locationshas been added to the workspace. Check Adding External Locations step.
Provide your Amazon S3 data:
S3 Bucket Name- The bucket nameS3 Bucket Path- Subdirectory under the above bucket to sync the data intoS3 Bucket Region- See here for all region codes.IMPORTANT: The metastore should be in the same region as the workspaces you want to use to access the data. Make sure that this matches the region of the cloud storage bucket you created earlier.
S3 Access Key ID- Corresponding key to the above key idS3 Secret Access Key-- See this on how to generate an access key.
- We recommend creating an HeroPixelspecific user. This user will require read and write permissions to objects in the bucket.
S3 Filename pattern- The pattern allows you to set the file-name format for the S3 staging file(s), next placeholders combinations are currently supported:{date},{date:yyyy_MM},{timestamp},{timestamp:millis},{timestamp:micros},{part_number},{sync_id},{format_extension}. Please, don't use empty space and not supportable placeholders, as they won't be recognized
Azure Blob Storage data source type (External storage)
IMPORTANT: The work in progress.
Sync Mode
| Feature | Support | Notes |
|---|---|---|
| Full Refresh Sync | ✅ | Warning: this mode deletes all previously synced data in the configured bucket path. |
| Incremental - Append Sync | ✅ | |
| Incremental - Append + Deduped | ❌ | |
| Namespaces | ✅ |
Configuration
| Category | Parameter | Type | Notes |
|---|---|---|---|
| Databricks | Server Hostname | string | Required. Example: abc-12345678-wxyz.cloud.databricks.com. See documentation. Please note that this is the server for the Databricks Cluster. It is different from the SQL Endpoint Cluster. |
| HTTP Path | string | Required. Example: sql/protocolvx/o/1234567489/0000-1111111-abcd90. See documentation. | |
| Port | string | Optional. Default to "443". See documentation. | |
| Personal Access Token | string | Required. Example: dapi0123456789abcdefghij0123456789AB. See documentation. | |
| General | Databricks catalog | string | Optional. The name of the catalog. If not specified otherwise, the "hive_metastore" will be used. |
| Database schema | string | Optional. The default schema tables are written. If not specified otherwise, the "default" will be used. | |
| Schema evolution | boolean | Optional. The connector enables automatic schema evolution in the destination tables. | |
| Purge Staging Data | boolean | The connector creates staging files and tables on S3 or Azure. By default, they will be purged when the data sync is complete. Set it to false for debugging purposes. | |
| Data Source - S3 | Bucket Name | string | Name of the bucket to sync data into. |
| Bucket Path | string | Subdirectory under the above bucket to sync the data into. | |
| Region | string | See documentation for all region codes. | |
| Access Key ID | string | AWS/Minio credential. | |
| Secret Access Key | string | AWS/Minio credential. | |
| S3 Filename pattern | string | The pattern allows you to set the file-name format for the S3 staging file(s), next placeholders combinations are currently supported: {date}, {date:yyyy_MM}, {timestamp}, {timestamp:millis}, {timestamp:micros}, {part_number}, {sync_id}, {format_extension}. Please, don't use empty space and not supportable placeholders, as they won't recognized. | |
| Data Source - Azure | Account Name | string | Name of the account to sync data into. |
| Container Name | string | Container under the above account to sync the data into. | |
| SAS token | string | Shared-access signature token for the above account. | |
| Endpoint domain name | string | Usually blob.core.windows.net. |
⚠️ Please note that under "Full Refresh Sync" mode, data in the configured bucket and path will be wiped out before each sync. We recommend you provision a dedicated S3 or Azure resource for this sync to prevent unexpected data deletion from misconfiguration. ⚠️
Staging Files (Delta Format)
S3
Data streams are first written as staging delta-table (Parquet + Transaction Log) files on S3, and then loaded into Databricks delta-tables. All the staging files will be deleted after the sync is done. For debugging purposes, here is the full path for a staging file:
s3://<bucket-name>/<bucket-path>/<uuid>/<stream-name>
For example:
s3://testing_bucket/data_output_path/98c450be-5b1c-422d-b8b5-6ca9903727d9/users/_delta_log
     ↑              ↑                ↑                                    ↑     ↑
     |              |                |                                    |     transaction log
     |              |                |                                    stream name
     |              |                database schema
     |              bucket path
     bucket name
Azure
Similarly, streams are first written to a staging location, but the Azure option uses CSV format. A staging table is created from the CSV files.
Unmanaged Spark SQL Table
Currently, all streams are synced into unmanaged Spark SQL tables. See documentation for details. In summary, you have full control of the location of the data underlying an unmanaged table. In S3, the full path of each data stream is:
s3://<bucket-name>/<bucket-path>/<database-schema>/<stream-name>
For example:
s3://testing_bucket/data_output_path/public/users
     ↑              ↑                ↑      ↑
     |              |                |      stream name
     |              |                database schema
     |              bucket path
     bucket name
In Azure, the full path of each data stream is:
abfss://<container-name>@<account-name>.dfs.core.windows.net/<database-schema>/<stream-name>
Please keep these data directories on S3/Azure. Otherwise, the corresponding tables will have no data in Databricks.
Output Schema
Each table will have the following columns:
| Column | Type | Notes |
|---|---|---|
_airbyte_ab_id | string | UUID. |
_airbyte_emitted_at | timestamp | Data emission timestamp. |
_airbyte_data | JSON | The data from your source will be in this column |
Under the hood, an HeroPixeldata stream in Json schema is first converted to an Avro schema, then the Json object is converted to an Avro record, and finally the Avro record is outputted to the Parquet format. Because the data stream can come from any data source, the Json to Avro conversion process has arbitrary rules and limitations.
Related tutorial
Suppose you are interested in learning more about the Databricks connector or details on how the Delta Lake tables are created.
